Pages

Thursday, August 16, 2012

A Pinteresting Nursery: More Seating

Since Maddie's room isn't very big, I tried to find pieces of furniture that would double up either in storage or in function.  I really wanted a built in window seat area, but since our windows come down so low, I knew it would be rather pricey for a built in since it would involve a window remodel.  So, off I went to my ever faithful Pinterest and started rooting around for ideas.  Here's what I found:


I loved the idea of a toy storage bench/seat!  And, luckily, I already had the perfect piece to go there.  Once upon a time, when this room was my scrapbooking area, I had purchased a Billy wall unit from Ikea and we had taken it down since we were moving my stuff out.  It was the perfect dimensions for the space.  The height of the bench is perfect for little ones without being too short for an adult to sit on.  I shopped around and found that the Closet Maid storage boxes were a good fit for the cubbies.


To make the bench pads, I purchased a 22"x22" chair pad from JoAnn's and cut it down the middle.  It made two pads that fit the top really well.  Now by the time I was working on the bench pads, I was tired of sewing and quickly running out of patience, so instead of making a box cushion cover and adding the cute piping I had envisioned, I decided to wrap the foam in the fabric and use a simple blind stitch seam on the ends.

Lessons learned: the bench pads will slide around, use a small piece of non-skid rug pad under each one to keep them from moving; when pre-ordering fabric from Etsy, count on it being delayed at least 6 weeks!!

Cost Breakdown:
Storage Unit - Ikea - $0 (already had on hand)
Chair Pad Foam - JoAnn's (with coupon - $16.77
Fabric - Etsy - $7.25 (1 yd @ $7.25/yd)
Bins - Target - $17.97

Thanks for stopping by!

Monday, August 13, 2012

A Pinteresting Nursery: Seating

Hi, I've got another Pinteresting nursery project to show you today, our refinished glider.  Our sweet friend sold us her glider for a great price but warned us that the cushions would need some reupholstering since her son had taken at red Sharpie to them.  To me, it was the perfect opportunity to try out a Pinterest project!! :)

The glider was finished in a natural wood color with cream colored upholstery.  Since all the furniture in the nursery was white, I knew some spray painting was in order.  We took the glider outside on a sunny day, cleaned it with a degreasing agent (don't remember which one), and wiped it down really well.  Then, we primed it with two coats of Zinsser's Cover Stain primer.

After letting it dry for a couple of days, we lightly sanded it down and sprayed it with several light coats of Rustoleum's Ultra Cover Spray in Gloss White.
With the painting complete, I started on the reupholstering process.  I used this and this pin from Pinterest to help me get started.  The sides were really easy to make and were done fairly quickly.  For the bottom cushion, I decided to buy a thicker pad and had to cut it to shape, my kitchen electric knife made that job fairly easy.  Since the bottom pad was thicker, I had to cut the back portion to make it fit.  During the process I completely forgot about the snaps at the back but the cushion is snug enough to stay in place on it's own so I'm not worried.  The gray zebra fabric is the same one I used on the crib bumper.


Next, I covered a small pillow using this envelope tutorial.  It was so quick and easy to make, I almost wish I had more pillows to cover!  The butterfly fabric is the same as the curtains.

Finally, I made a double sided blanket using this tutorial.  I actually remembered to wash my fabrics first which was a good thing since both of them shrunk significantly!  The hardest part was how much the fluffy fabric shifted!!  I used tons of pins and safety pins and it still shifted quite a bit.  I also used a quilted fluffy fabric instead of the minky fabric the tutorial recommends, that may have affected it.
 Overall, this was probably the most involved DIY project we did for the nursery.  It did take quite a bit of time and materials, but in the end it was worth it.  The glider fits in with the room perfectly and it's a super comfy place to just sit and relax (hmm, maybe I should move into MY bedroom!!)

Cost Breakdown
Gilder - purchased from friend - $50
Primer - Home Depot - $11.16
Spray Paint - Home Depot - $11.61
Chair Pad Foam - Hobby Lobby (with coupon) - $7.79
Zebra Fabric - JoAnn's (on sale) - $12 (3yd @ $4/yd)
Rectangle PillowForm - Hobby Lobby (with coupon) - $4.79
Butterfly Fabric - Hobby Lobby (on sale) - $2.10 (1/2yd @ $4.20/yd)
Total Cost: $99.45

Have you reupholstered a glider?  Link up your pics in the comments!

Thursday, August 9, 2012

A Pinteresting Nursery: Lighting 2.0

Hi peeps, I'm back today with another lighting project I did for the nursery.  This one isn't really a Pinterest inspired project, but there's plenty of inspiration out there for something similar.


I needed a small table lamp for the nightstand and I wanted something cute and ruffly.  After looking everywhere, I couldn't find something that I loved, so I decided to make my own.  I purchased a simple lamp at Wal-Mart and some satin ribbon from Michael's and got to work.  Here's what I came up with:


First, let me tell you, I severely underestimated the amount of time and ribbon this lamp would require.  I purchased two 10 yard spools and though I'd be fine.  Umm, no, it took 5 spools and several episodes of Once Upon A Time before I was done with this project.  Luckily, it was one of the projects I started earlier in my pregnancy and I didn't mind taking the time.

To attach the ribbon onto the lamp shade, I covered the lamp shade with 1" wide Sookwang tape all around. Then I followed Ashley Cannon Newell's video instructions here for the ribbon ruffling.  The ribbon I used is Michael's satin ribbon in Tiffany Blue.  Looking back, there's several things I would do differently if I had it all to do over again.  First, I'd probably paint the lampshade to match the ribbon.  Second, would cover the rim with ribbon for a more finished look.  And third, I would end the ruffles at each row and start a new one instead of working in a spiral.  This left me with a wonky edge at the end that is cleverly hidden towards the wall.

Cost Breakdown:
Lamp - Wal-Mart : $13.00
Ribbon - Michael's (on sale) -  $12.50 (5 rolls @ $2.50 ea)
Total Cost: $25.50


Has anyone out there made anything similar?  I'd love to see it and hear your thoughts!!

Thanks for stopping by!

Monday, August 6, 2012

A Pinteresting Nursery: Lighting

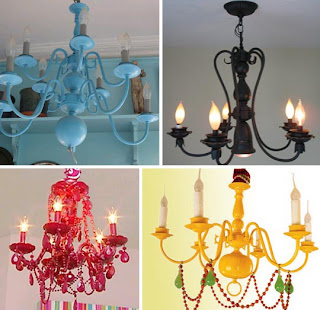
As I mentioned before, I found lots of my inspiration for Maddie's nursery on Pinterest.  One of the ideas I'd seen and loved were the bright colorful chandeliers I'd seen in model rooms and DIY boards.


Since the room isn't decorated in traditional girly colors, I felt that there needed to be plenty of feminine features in the room.  So, I wandered through several home improvement stores and perused lots of websites in search of the perfect chandelier for the room.  Unfortunately everything was out of my price range and there really wasn't anything that I loved for the room.  I was quite frustrated and about to start looking for alternatives when I had an "aha" moment.  Why not repurpose an old chandelier instead (like the old one we had in our dining room and we got rid of, ugh!!).  So off to Craigslist I went and I found THIS advertisement!  It was exactly what I was looking for!!!  And, even though a prefinished one was out of our price range, it made me realize that what I wanted could be done.  After a bit more perusing through the ads, I found an ad for a brass chandelier that fit my requirements exactly, $20 and an hour later I was on my way to getting this done.

After picking up additional supplies from Lowe's, JoAnn's, and Hobby Lobby, I was in business.  The longest part of the makeover was painting the chandelier.  First we lightly sanded, wiped down, and taped off the lighting fixtures.  Then we started lightly coating it with Valspar's Blue Lagoon spray paint.  Between the chandelier and the medallion, we used 2 cans.  I loved the color, but I wish I'd used Rustoleum spray paint instead.  I found that Valspar's glossy spray stays tacky to the touch and didn't allow for a completely smooth and glossy finish.

Once we let the paint dry thoroughly, then I added all the beads and bling.  I couldn't find aqua beads at any of our local craft stores, so I dyed them instead.  To do this, I placed the beads in a ziplock bag with about 5 drops of Ranger's Alcohol Ink in Sail Boat and then I smushed the beads around in the bag until they were all coated evenly.  I laid them on a dry paper towel to dry and they were ready to use in less than 5 minutes.

To string the beads, I tied nylon beading thread to a small jump ring and alternated large and small beads in clear and aqua.  I used about 28 beads in each size to get the right length for this chandelier.  I tied off a second jump ring to the other end and each section was complete.  To attach them, I used my Crop-A-Dile to punch holes at the top and on each arm of the chandelier and used small pliers to open and insert the jump rings into the holes.

I finished off the dip in each arm with clear oval drop beads using the nylon thread to attach them directly to the chandelier.  And voila, a beautiful custom lighting fixture for less than your average ceiling fan.

Cost breakdown:
Chandelier - $25 on Craigslist (would've been free if I'd thought to keep our old one!)
Medallion - $19.97 at Lowe's
Spray Paint - $7.96 at Lowe's
Beads & Supplies - $22.50 at Hobby Lobby and JoAnn's
Total Cost: $75.43


Thanks for stopping by!

Saturday, August 4, 2012

Baby Maddie is on the Way!!!

So, it seems I fell off the face of the earth again :(  but it's been for a very good reason.  Our first baby will be here any day now and we've been working like busy little bees to get not only her nursery, but other areas of the house as well, ready for her arrival.  Add in the fact that we sacrificed my scrapbooking room for her nursery (I know, I know, it's hard making grown up decisions!!) and there's been no time for papercrafting.  I actually bought cards this year for Father's Day, bleh, they were super pricey and SOOO generic.  But all's not lost, my scrappy tools have seen some use in the past few months, it's just all been baby related and I promise to it all to you in the next few weeks.

Since this is our first journey into the world of kids, I quickly turned to the internet, and my BFF Pinterest for ideas and inspiration for all things baby.  And, as usual, Pinterest did not disappoint.  Not only did the majority of my ideas come from there, but the boards were great for corralling all of my purchasing sources.  We were definitely on a budget for our nursery and the majority of the items in this room are either DIY or customized by yours truly and the hubby.

Ready to see some pics?


When we found out we were expecting a girl, all of my previous gender neutral concepts flew out the window.  I knew I wanted a girly space, but I also knew I didn't want to overdose on Pepto Bismol pink.  She has a whole life of pink ahead of her, so we decided to go with non-traditional colors instead.  After looking at inspiration pictures online, in magazines, and on TV, I realized that we were quite drawn to rooms that had aqua or grey in them and we definitely had a strong preference for white furniture.  So, that's how our color scheme came about.  After choosing our colors, the room slowly started to come together in concept as we factored in the items we knew we wanted in the space, such as a dresser with a changing pad instead of a changing table.  Luckily, we started planning out the space since March so there's been plenty of time to wait for sale prices, work on projects a little at a time, and ponder over decisions.  All of this, I think, helped us to create a truly unique space that we love and can grow along with our baby.

There's so many items in our nursery that I would love to expand on and go over with you, but it would be way too much for one post, so I'll be back throughout the next few weeks or so with individual posts on the items we incorporated in our nursery and links to the tutorials and/or inspiration pieces.

Thanks for stopping by!!