Pages

Monday, March 29, 2010

Velvet Stamping and Tutorial

I know I’d seen it before and the bold images from Prickley Pear are just perfect for it, so after a little Googling, I decided to go for it. I purchased some velvet, pulled out some stamps, and held my breath. Here’s the final results:

Not too bad, huh? And it was so super easy to do. Here’s a breakdown of how I did it:

First, I cut my velvet down to the size I would need for my sachet.

Then I made sure my iron had a spot on the plate that did not have any holes and I emptied out the water from the reservoir. I turned it up to high and let it heat up.
I placed my stamp rubber side up on the ironing board and positioned my velvet, pile side down on top of it.

I lightly sprayed the velvet with water from a water bottle. Hint: try to concentrate the spray only on the area on top of the stamp.
You take the iron and firmly place it over the velvet on top of the stamp. If your iron has holes, make sure you position your iron so that the area that has no holes is directly on top of your stamp.
Hold the iron in place for 15-20 seconds and then lift the iron straight off the velvet. Gently peel back the velvet and take a look at your impression.
If it’s too light, you can carefully lay the fabric right back over the stamp and heat it with the iron for another 10 seconds.

And voila, you are done. Now you can take your fabric and make it into sachets, drawstring bags, scarves, etc.
Now, this works with most high quality rubber stamps as they can withstand the brief heat of the iron. However, I cannot attest to the durability of any particular stamp. Please do not try this with acrylic stamps as they are more delicate to heat.

The bolder the image, the better your results will be. Although I was pleasantly surprised at how well the detail of the stamp appeared on the velvet.
If you have any questions or need clarification, please leave me a comment and I’ll try to respond within 1-2 days.

Now that I know how easy it is, I’d love to try this with some large background stamps and make some cute throw pillows. What project will you make?

Saturday, March 27, 2010

Spring Time and Cheer Up

Hi guys, I'm back with two cards today.  The first one is based on this week's Mercy sketch.  I used my new Kioshi pad from Basic Grey and an image from Prickley Pear that I had previously watercolored using twinkling H2O's.  I stamped and embossed the image onto watercolor paper and used my twinkling H2O's like watercolors to color the image.  I love how they give just the right amount of shimmer to give the image some pizazz without making it overwhelming.  Anyways, here's the card:

And a closeup of the stamped panel:

The paper did warp a bit from the watercoloring and embossing, but not enough to bother me.

Supplies:
papers: Kioshi Basic Grey, watercolor paper, green cardstock
stamp: Prickley Pear
other: ribbon, button, twine, brads

I also made another card for a friend who's been having a hard time lately.  I'm hoping to give it to her paired with a little box of candies to help cheer her up.  It's hard to be sad when you're eating some chocolate! :) 

I used a previous Mojo Monday sketch and some new SEI paper I picked up recently.  I only bought one sheet, but I can already tell I'll be back for more.  When I first saw this stamp at Verve, it just called to me.  I loved what the verse was saying, to me it seems like a hopeful message.

Supplies:
papers: SEI, BoBunny, DCWV, black and white cardstock
stamp: Verve - Plain Jane
other: black ribbon, pink rhinestones

I'm experimenting with a fun project this weekend and I'm hoping for good results so I can share with ya'll (yes, I'm a Texas girl!) on Monday.  Wish me luck!

Enjoy your weekend.

Tuesday, March 23, 2010

Better Get Better

Hi guys!  It's been a while since I've posted here.  Aldo and I are still working on the house and I'm in the middle of spring cleaning, so not much stamping time.  I did manage to get this card done during some down time.

It's based on last week's Mercy sketch.  I decided to keep it pretty simple since the red is such a bold color.  The inside is finished out and I just need to stamp the sentiment inside.

I'm hoping to get some stamping time in this weekend, so be on the look out for some new stuff sometime around Sunday.

Thanks for stopping by!

Supplies: Better Get Better stamp - MFT; cardstock - Bazill; patterned paper - American Crafts; flowers - Prima

Sunday, March 14, 2010

Flopsey and Joline

Happy Sunday!!  Today I'm posting two MFT cards I made.  Jolinne was put together last weekend at a friend's request.  She's colored in purple tones using copics.  The paper is Basic Grey and the large embellishment is from We R Memory Keepers.  I added candlelight shimmerz to her wings to give them an iridescent/sparkly finish.  On the inside, I stamped the Jolinne image again using Versamark ink.  Here's the pictures:

As soon as I purchased Reading Flopsey, I knew I wanted to make a card that incorporated a traditional library check out card.  Yesterday, while shopping at Anthologies, I found just the perfect set of library cards by Maya Road.  So, I pulled out a fossil notecard by MFT, rooted around for some paper scraps and cut out some words from my dictionary to pull this card together.  I designed the card using last week's Mojo Monday sketch.

That's all I've got for today.  Did you remember to spring forward last night? 

Sunday, March 7, 2010

Snuggle Bunnies

Hi guys!  I did make another baby card, but while I was at it, I also went ahead and participated in MFT's Wednesday's Stamp Club challenge.  This week it's a sketch challenge, which I just love.  Lately, I haven't had too much time to do any of the challenges, so it was fun to be able to play along.  I made this card, CASEing this card by Melody.  I just love the stuff she creates!  So here's my rendition of it using this week's sketch:

I only wish my sewing was a good as hers!  It's my first time sewing zig zags and there sure is a learning curve to it.  I used Jody's sewing tutorial to get my bearings and then went from there.  Note to self: practice on scrap paper first! Lol,  I had to do a couple of panels before I figured it out.  The image is colored with copics and their tails are puffed up with liquid applique. 

Supplies:
Stamps: MFT - Snuggle Bunnies
Paper: BG - Nook & Pantry, MFT - hot fudge
Ink: Memento, copics
Other goodies: Nestabilities, Kenmore sewing machine, liquid applique, crochet lace

Enjoy!

Saturday, March 6, 2010

Still In Baby Mode

Happy Saturday!!  Well, I'm still in baby card making mode.  I still had the baby paper out, so I decided to make one more using Jen's Sketch.  Instead of using dark brown, my usual go to neutral, I decided to opt for craft cardstock and I really like the way to color scheme turned out.  Just right for a baby card.  I used a previously colored Whiff of Joy image, some shimmer flowers, MFT's chocolate kiss ribbon, and my new Teresa Collins paper. 

I've got photos of one more card to edit and then I'll post it up here.  Have a great weekend!

Friday, March 5, 2010

Pearls and Lace

Hi ya'll.  I'm back with another project I made using some of my Prickley Pear collection:

I made this canvas using a vintage colored icon.  The paper's are from Harlee Quinnz Designs.  I picked them up during the CKC convention last year.  The pearl pin is Maya Road and the metal plaque is from Making Memories.  I also added some prima flowers and used a pearl embellishment I picked up at Archivers last year.  The canvas was painted with pink acrylic paint and sponged with tea dye distress ink.  Here's a closeup of the image and the flower.  The papers were heavily distressed, wrinkled, torn, and sponged.


Hope you have a wonderful weekend!

Thursday, March 4, 2010

Baby Boy

We're planning a baby shower for a coworker who's having his first baby and a friend asked me to make her a couple of cards.  In making the first card, I realized just how limited my baby boy selection was!  So after making the first card, I set off to a couple of my local scrapbook stores and found some great goodies.  I found some sweet Teresa Collins double sided paper and I was finally able to get my hands on the super cute Teddybella from Stamping Bella.  It was the last one too!! Here's the my first card:

The image is Willow with Toddler from Whiff of Joy.  I colored her with copics.  The paper is from My Mind's Eye and Martha Stewart.  As usual, I finished off the inside with coordinating papers.

Here's my second card and the result of a very satisfactory shopping trip :)


Bella and her shopping bags were colored with copics.  The strips on the green bag and the dots on the blue bag were added with the copic blender.  Her shirt was paper pieced and a second layer was added for her tummy using a pop dot.  After cutting the image with my spellbinder nestie, I softly sponged around the edges with summer sky memento ink.  The card needed a bit of pizzaz, so I added a "b" tag on the corner using memento summer sky ink and my bling bet from MFT.
Now that I've got my creative mojo going, I'm hoping to spend some serious crafting time during the weekend. 

Thanks for stopping by!


Tuesday, March 2, 2010

Howdy Partner

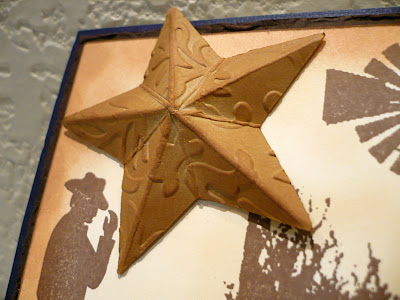
This year, I promised myself that I would make every effort to make my special occasion cards and deliver them on time this year.  So, in looking through my stash of Prickley Pear stamps, I decided that the cowboy theme fit very nicely with Father's Day.  Here's what I came up with:

The front panel was stamped on an MFT cream perfect panel.  On the inside, I decided to use several pieces of twine to hold my easel card open.  Both stars were cut with my cricut, embossed with a cuttlebug folder, and the larger star was scored and folded for a 3-D Texas star effect.  Both stars were also sponged with distress inks for added depth.

Supplies
Paper: MFT cream perfect panel, Bazzil preppie, craft cardstock
Stamps: Prickey Pear - cowboy, windmill, howdy partner, happy father's day
Inks: Memento - Rich Cocoa, Brilliance - Chocolate, Distress Ink - Vintage Photo, Tea Dye
Accessories: twine, cricut, cuttlebug embossing folder - victoria, scoreboard, distressing tool

So how are you coming along with your New Year's resolutions?

Monday, March 1, 2010

MFT Girlies

I finally got around to playing with my new Jolinne fairy from MFT.  I don't know about you, but I'm just loving this new line!  And, MFT is all set to release some new sets this Wednesday.  Be sure to join their release party at Splitcoast Stampers, the MFT girls are some of the sweetest and funniest ladies ever.  Okay, here's the card:

She's colored with copics and her necklace is embellished with an MFT adornment crystal.  The papers are Creative Memories and Basic Grey.  Her wings were outlined with a stardust pen and the glitter was spread throughout the wings using an aquapainter filled with rubbing alcohol.  A tip I learned from Jen Del Muro.

I also did a card using a Mercy sketch from last week using my very first MFT stamp set, Hey Chica!  The background papers were distressed and I added dusty pink sponging around the girl and on the black scallop circle for an added grungy feel.  I also misted the pink flower with gold shimmer spray that makes it look so pretty and sparkly.  After I took the pictures, I went back and added some clear glaze pen to her lips for a shiny lip gloss look.

Thanks for stopping by!